|
Overview
All
of our kits are plug and play. There is no wire
cutting. For
this reason, the factory bulbs can always just be plugged back in.Our
HID kit can be removed as easy as it is installed.
To
install our system, just
mount the ballasts, plug it in and your done. The step-by-step
instructions below will help you with the installation.
| Diagrams
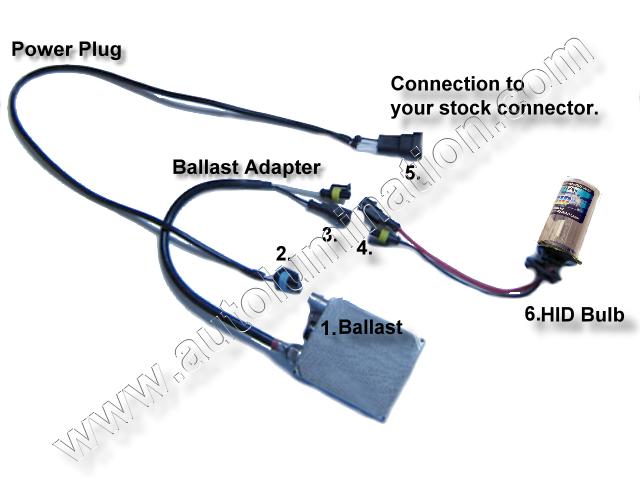
1: Basic Installation |
Diagram
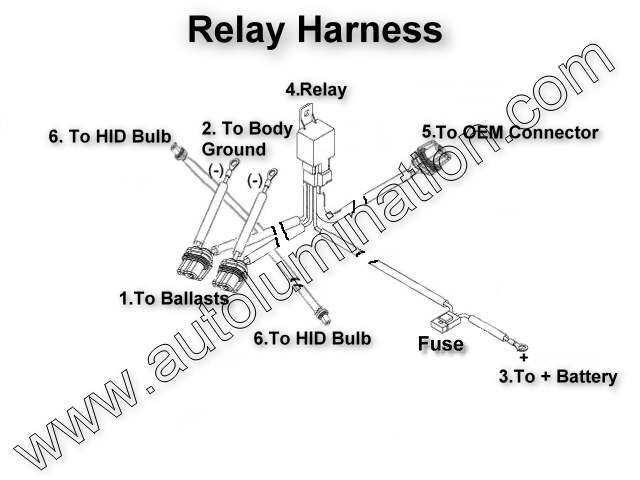
2: Relay
Harness (H4, H13, 9004, and 9007 Bi-Xenon |
 |
 |
|
___________________________________________________________________
Installation
(Single bulb systems H1, H3, H7, H8, H9, H10, H11, 9005, 9006, 800
series, D2C-R-S:
1.Disconnect
the car battery terminal.
2.Disconnect the stock connector from the factory light bulbs (you will
use these later). Remove the factory light bulbs. Keep the
factory light bulbs and you can install them again anytime.
3.Replace the factory light bulbs with the HID bulbs.
Note: If the HID
bulbs get dirty or oily, use rubbing alcohol to clean the bulbs, do not
immerse bulbs in any liquid. Avoid touching the crystal with your
fingers. Never light a dirty, oily or wet bulb or it may
shatter the crystal.
4.Find the best mounting location for the ballasts.
- Do not drill holes in the ballasts.
- Mount the ballasts away from moving components, such as A/C or power
steering pump.
- Mount the ballasts to a solid location.
- For best cooling, mount the ballasts in a well ventilated location
away from exhaust manifolds and radiators.
- Allow the necessary distance for all harnesses to reach the bulbs and
the power harness to reach the factory bulbs connectors.
5.Connect the two connectors (3 & 4) coming from the ballasts to the HID bulbs (See
#3 and #4 in Diagram 1 above). This is what sends power from the ballasts to the HID bulbs.
6.Route the wiring harnesses in the engine bay. Do not locate wires near
any moving parts (belts, fans or pumps). Avoid the hot engine
parts or radiator.
7.Attach the power plug to the ballasts (See Diagram 1 above, #1 and #2).
8.Attach
the other end of the power harnesses to the stock
connector that was plugged into the factory bulbs. This is what
powers and switches the HID lights on and off.
8.Reconnect the car battery cables and make sure all components are
secured.
9. Always start the engine first before switching on the HID system.
Repeatedly switching on the HID lights with the engine off,or a low or weak battery will
result in failed ballasts starts and cause premature failure of the
ballasts and bulbs.
11.
(Optional) Adjusting
the
HID Headlights
|
|
__________________
Installation
- Dual-Xenon Kits H4, H13, 9004, and 9007
(See Diagrams 1 and 2 above)
1.Disconnect
the car battery terminal.
2.Disconnect the stock connector from the factory light bulbs (you will
use these later). Remove the factory light bulbs. Keep the
factory light bulbs and you can install them again anytime.
3.Replace the factory light bulbs with the HID bulbs.
Note: If the HID
bulbs get dirty or oily, use rubbing alcohol to clean the bulbs, do not
immerse bulbs in any liquid. Avoid touching the crystal with your
fingers. Never light a dirty, oily or wet bulb or it may
shatter the crystal.
4.Find the best mounting location for the ballasts.
- Do not drill holes in the ballasts.
- Mount the ballasts away from moving components, such as A/C or power
steering pump.
- Mount the ballasts to a solid location.
- For best cooling, mount the ballasts in a well ventilated location
away from exhaust manifolds and radiators.
- Allow the necessary distance for all harnesses to reach the bulbs and
the power harness to reach the factory bulbs connectors.
5. Connect the two connectors (#3 & #4) coming from the ballasts to the HID bulbs (See
#3 and #4 in Diagram 1 above). This is what sends power from the ballasts to the HID bulbs.
6.
Find the best mounting location for the relay (See Diagram 2 above #4).
- Do not drill holes in the relay.
- Mount the relay away from moving components, such as A/C or power
steering pump.
- Mount the relay to a solid location.
- For best cooling, mount the relay in a well ventilated location
away from exhaust manifolds and radiators.
- Allow the necessary distance for all harnesses to reach the bulbs and
the power harness to reach the factory bulbs connectors.
7.Route the wiring harnesses in the engine bay. Do not locate wires near
any moving parts (belts, fans or pumps). Avoid the hot engine
parts or radiator.
8.Connect the relay plugs (See Diagram 2 above #1) to the ballasts. Attach the - ground lug
(See Diagram 2 above #2) to any solid metal body ground location on the vehicle.
9.Attach
the other end of the relay harness to the stock
connector that was plugged into the factory bulbs (See Diagram 2 above
#5). This is what
powers and switches the relay on and off.
Note: This connection can be made to either
the passenger side or driver's side. The OEM headlight connector
on the opposite sideis not needed. It should be properly
stowed for future use if needed.
10.
Attached the power wire on the relay harness to the + battery
terminal (See Diagram 2 above #3). This provides power direct from
battery for
switching on and off the ballasts thru the relay.
11.
Attached the two remaining connectors on the relay harness to the HID bulbs (See Diagram 2 above
#6). This provides a signal and power to the HID bulb toggle mechanisms
to switch between bright and dim positions.
Note:
Only our special relay harness and ballasts designs eliminate flickering, blown fuses and blackouts
while switching between dim to bright modes associated with most other
HID systems. With this system you get true HID light for
both High and Low beam operation.
12.Reconnect the car battery cables and make sure all components are
secured.
13.Always
start the engine first before switching on the HID system.
Repeatedly switching on the HID lights with the engine off, or with a
low or weak battery will result in failed ballasts starts and cause
premature failure of the ballasts and bulbs.
14.
(Optional) Adjusting
the
HID Headlights
|
___________________________________________________________________
Troubleshooting:
Both HID bulbs keep flickering and making clicking noise:
1. Ensure that the HID bulbs have been connected to the ballasts correctly and tightly. 2. Ensure the battery is producing
at least 12 volts. 3. If your vehicle low beam has daytime running lights, you may need to disconnect those. Never switch on the HID
system until after the motor is running.
HID
turns on then both sides go out:
Check all
fuses. Please check your fuse box according to
your vehicle's user manual and upgrade the stock 10Amp or 15Amp headlight
fuse to 30Amp. The 30Amp fuses are
100% safe for your vehicle, they will not cause problems or damage to
your vehicle.
Only one light works, although both lights are installed exactly the
same:
1. The +/- polarity of one side might not match with the stock harness. 2.
The fuse might be blown on one side. 3. Malfunctioned parts.
Inspection Procedure: Check all connections between the bulb, ballast,
& relay. Check the fuses. Use
at least 30Amp fuse if the stock 15Amp fuse blows. Switch the failing bulb
module to the opposite side to see if the problem remains. If the failing
light now works, you may have a bad connection on the opposite side, or the ballast may
have failed. If the problem still persists,
the Ballast and/or Bulb may have failed. Check the ballasts and
bulbs. Switch one to the working side of the vehicle. If the problem
still persists, the ballast and/or bulb is malfunctioning.
The ballasts make electrical noise when first turn on:
This is normal, the ballasts are absorbing powers from the battery
to start up, that's why you hear electric noise.
The HID works initially but starts to flicker sometimes:
This may be caused by
a loose connection, low battery voltage or damaged bulbs or
ballasts. Never switch on the HID system until after the motor is
running.
Inspection Procedure: Switch off the HID system immediately. Disconnect
each connector and clean with alcohol. Wait more than 5 minutes (to allow the
Ballast
Safety Micro Chip to reset). Reconnect each connector.
HID will only work when the high beam is turn on:
Make sure you have
plugged in all wires correctly to their positions and +/- polarity is
correct.
The HID bulbs changes color when first turn on:
This is normal. At the beginning, the ballasts are storing the
power from the battery of the car. Since the power has not been
stabilized yet, the bulbs will might have different colors or even
flicker a little bit. As soon as the power is stabilized to the
ballast, the bulbs will light normally.
The colors or lighting effects of the two bulbs are different:
1. The level of the two sizes' headlight housings are not even.
See Adjusting
the
HID Headlights 2. For new bulbs, the colors
may be slightly different for first few hours
of burning. The colors will adjust slightly after the first few hours of
operation.
One or both
bulbs will not light or bulbs turn off after the vehicle is started:
HID systems
requires a steady level of battery voltage of at least 12Volts in order for
the ballasts to to start up. The "Auto Headlight Switch-On" and
Daytime Running Light functions draws excessive power from the vehicle battery.
This can cause the HID system to not switch on.
If you have Daytime Running
Lights, try disconnecting the fuse
or wiring of Daytime Running Lights only.
If you have "Auto
Switch-On" Headlight function (Automatic Daylight Sensor) , set the switch function to
"Manual Switch-On" headlight mode.
Never switch on the HID system until after the motor is running.
If
these do not remedy the problem, you may need to install an HID
Relay Harness to
resolve this problem.
TIPS to prolong
the life of the HID kit:
1.
Oh, did you read this? Always start the engine with the lights off. Switch the lights on
only after the engine has started.
2.
Avoid switching the headlights on and off frequently. As with all
electronics, HID systems have a limited number of starts and stops
before they will fail.
3.
Install the HID ballasts
and bulbs away from direct engine heat. Install the HID ballasts
and bulbs to avoid them from getting wet.
4.
Ensure the connectors of the HID system are installed tightly.
|